
What is Spring Security
Spring Security is a security framework that works on top of Spring framework to provide security related features to your JAVA applications. It is an open source spring project maintained by people from Pivotal. This framework supports both authentication and authorization functionalities, as well as mitigates common security concerns like session fixation, Cross Origin Resource Sharing (CORS), Cross Site Request Forgery(CSRF), HTTP Strict Transport Security(HSTS) and many others. This framework can be easily integrated with Web API as well as Spring MVC projects. It is designed such a way so that it is heavily customizable and extendable to meet the complex business need. This Series focuses on understanding the structure and idea behind every component of spring security so that anyone who follows the series can easily apply Spring Security in their spring projects.
Why to use Spring Security
If you are working on any Servlet based API project or Spring MVC project, if you want to create your own security framework from scratch, it will be very much daunting and time taking. Time constrained projects can not even afford such vast development. It is okay to develop a security framework for your own if you want to learn all aspect of web security by yourself. But in real life enterprise projects it would be reinvention of wheel and most of the project can not afford such huge development. This is analogous to developing your own game engine as opposed to using a game engine that is publicly available. Moreover if you are using a framework such as Spring Security, you are actually using a battle tested solution that works for most of the cases. Spring Security, being an open source project, you can say every contributor to this project is in your security team, developing alongside you to deliver the best possible security to your application.
Adding Spring Security in your Spring Boot Application
Bootstrapping a Spring Security Project using Spring Boot and Maven/Gradle is lot easier than you think. So let’s get started.
Oh, before proceeding, lets discuss what you need to follow along the series.
What do you need to have
- A computer with internet connection.
- JDK installed and configured. I will be using JDK 16 for this series. I would recommend you to do so to follow along. But this is not a strict requirement. I might use certain feature in the series that was introduced beyond JAVA 8. If you are pulling the code-base from GitHub and executing them as opposed to writing them on your own, some of the code might not compile. If you know how you can change the advanced JAVA features to JAVA 8 compatible counterpart, then you are golden as Spring Security supports JAVA 8.
- Fundamental knowledge of Spring Boot and Spring Framework in-general. No advanced knowledge is required though.
- A JAVA IDE. I would be using IntelliJ Idea Ultimate 2021.2+. It is not mandatory to use this, but I would suggest you to use at-least the community edition of IntelliJ Idea, because its the best JAVA IDE. This Series does not use anything that is only available in the Ultimate edition of the IDE.
- Postman to test API.
Creating Your Spring Security Project
- I have pre-configured the project in Spring Initializr. Click here and directly generate the project.
- Unzip the generated project and open it in your IDE.
OR
- Checkout the project from GitHub.
- Switch to spring-security-chapter-1 branch to remove future projects.
- checkout the first commit in that branch.
- open the project spring-security-01 within the folder.
After opening the project, your pom.xml should have the below dependencies.
 <dependencies>
        <dependency>
            <groupId>org.springframework.boot</groupId>
            <artifactId>spring-boot-starter-security</artifactId>
        </dependency>
        <dependency>
            <groupId>org.springframework.boot</groupId>
            <artifactId>spring-boot-starter-web</artifactId>
        </dependency>

        <dependency>
            <groupId>org.springframework.boot</groupId>
            <artifactId>spring-boot-starter-test</artifactId>
            <scope>test</scope>
        </dependency>
        <dependency>
            <groupId>org.springframework.security</groupId>
            <artifactId>spring-security-test</artifactId>
            <scope>test</scope>
        </dependency>
 </dependencies>
I have added one RestController to have a simple Rest endpoint to test.
@RestController
public class TestController {
    @GetMapping
    public String test(){
        return "Hello World";
    }
}
Running the Application
Run the application and open up Postman to test our endpoint.
In Postman make a GET request to http://localhost:8080/. You should get something like this:
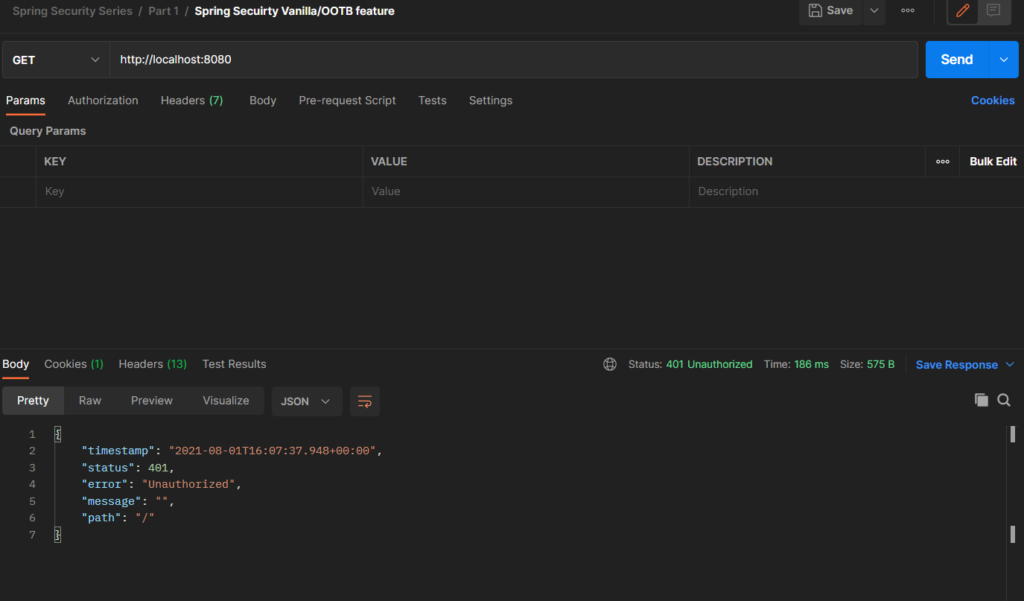
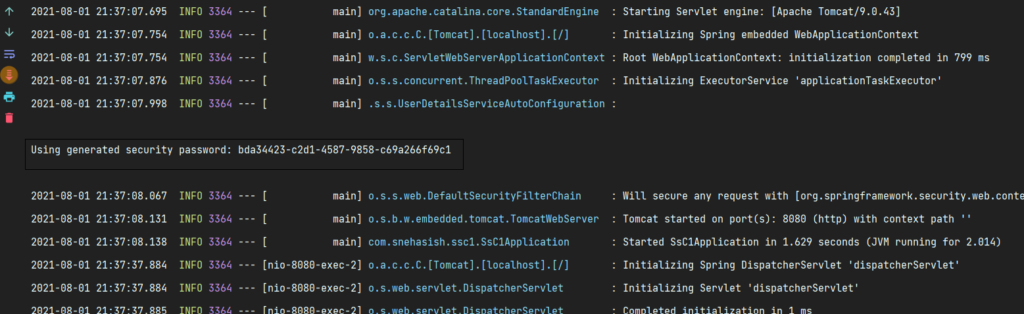
That’s cool and all. But how can we access the API now. We do not have any login credentials. Actually spring has already created a login credentials by default. The default username is user, and the password is a randomly generated UUID. This gets randomly generated every time you run the application. look closely at your terminal/console, you will see something like below in your console:
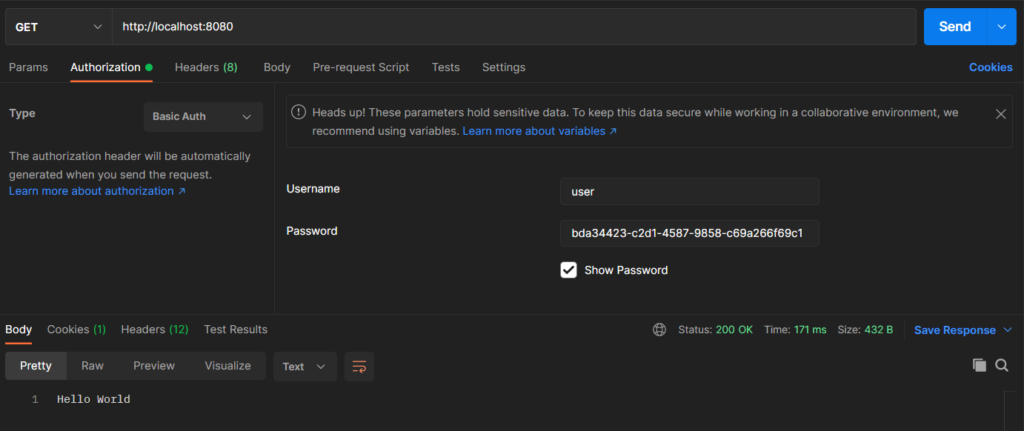
Now let’s access the API by providing the credentials to Postman.
- Go to Authorization Tab in Postman.
- Select the Type as Basic Auth.
- Provide the credentials as we just talked about.
- Submit the request. This time the API would go through.
How does that work?
When we provided the username and password in postman, postman automatically encoded the username and password with Base64 encoding concatenated them with a colon in between, and sent that to the server by putting it in Authorization header. You can see that by going to the Headers tab in Postman.
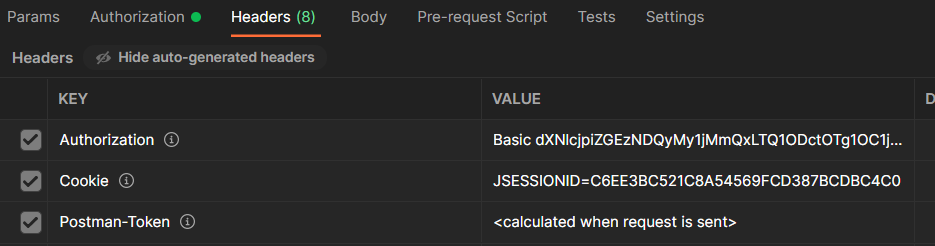
Please Note that this is a Base64 encoding, not an encryption. So if you use non HTTPS mode of transmission, then these information would go in clear text across network and can easily be decoded.
Now you might be asking, how the application knows something would come in the Authorization header and then process that to grant the access to the API. Lets discuss that in detail in the next section.
Understanding the basic architecture of Spring Security
When you added the spring-boot-starter-security, with the magic of Spring Boot Auto Configuration, It created something called a FilterChainProxy. You can think of them as list of Filters in Java EE. So before coming to your controllers, the HttpServletRequests goes through all these filters in the filter chain and gets preprocessed. You can also compare them with middlewares in the context of NodeJs/ExpressJs.
Each filter in the filter chain is responsible for different preprocessing tasks. One of the filters that was added by Spring Security by default is BasicAuthenticationFilter. If you tap double Shift in your IntelliJ IDE, then you can search for any class available in your Project’s context. Tap double Shift and search for BasicAuthenticationFilter and you would get a de-compiled version of the class opened for you in reading mode. You can see the class extends an abstract class OncePerRequestFilter. If you follow the hierarchy, you would see that it implements Filter of JAVA EE. If you see all the available subclass of this OncePerRequestFilter, by clicking on the gutter menu item in IntelliJ, you would find apart from BasicAuthenticationFilter, there are many other implementations like CorsFilter, CsrfFilter, CharacterEncodingFilter, MultipartFilter etc. All of these filters are responsible for performing certain preprocessing on the incoming HTTP request and then forwarding to the next filter in the filter chain.
In the upcoming parts in the series we would be creating our own custom filters that does custom preprocessing for us. But before that lets dig deep and see how Spring Security is designed its authentication mechanism which we can use/extend/modify.
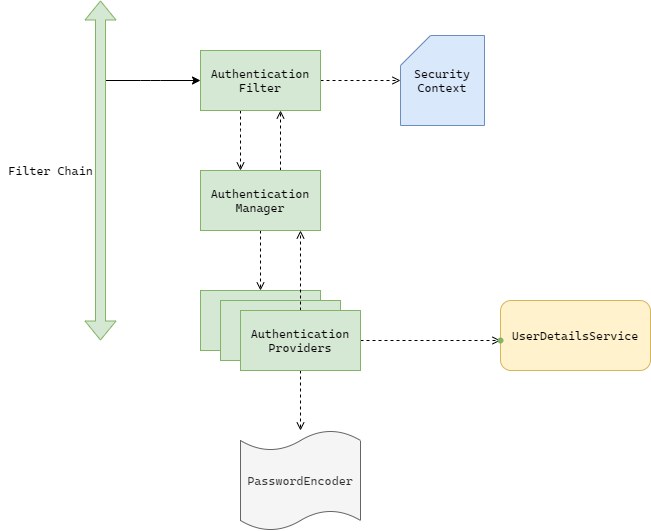
In the above diagram, the solid arrow represents the HTTP request and the dotted arrows represent the dependency between components. We have already talked about the FilterChain component previously. Lets now discuss on the other components present in the Architecture Diagram.
Different components in the Architecture of Spring Security
AuthenticationFilter
This is one of the many filters of the Spring Security’s filter chain. The main task of the filter is to extract the provided credential from the incoming request and then pass the credential to AuthenticationManager. The filter does not do any thing to validate the credentials, it just delegates the job to AuthenticationManager. After the AuthenticationManager returns the validity of the credentials, the filter stores the authenticated information in a specialized storage called SecurityContext. if the credentials turn out to be invalid, then the filter might throw an exception or pass on to the next filter in the filter chain. It completely depends on the implementation.
AuthenticationManager
Authentication manager keeps track of the available authentication mechanism in the system and then delegates the authentication process to the appropriate mechanism by looking at the credentials that the AuthenticationFilter sent. In your application you might have username/password based authentication along with the social login such as Facebook, Google, GitHub login. Also it might have login with Enterprise SSO with LDAP/Kerberos authentication. AuthenticationManager is the one who keeps a registry of all available authentication mechanism and when it receives an authentication request from the authentication filter, it delegates the authentication request further to the proper mechanism and wait for the mechanism’s response.
AuthenticationProvider
Authentication providers are the mechanism that can validate an authentication request. So AuthenticationManager keeps track of all the available AuthenticationProviders to send the appropriate authentication request to the appropriate AuthenticationProvider. In your application, you might have multiple type of authentication mechanism . Each Provider is responsible for each type of mechanism.
UserDetailsService
UserDetailsService is an interface that is required by each AuthenticationProvider so that they can lookup the user in the system. Its a contract with one abstract method loadUserByUsername which the AuthenticationProvider will call to get the UserDetails.
public interface UserDetailsService {
    UserDetails loadUserByUsername(String var1) throws UsernameNotFoundException;
}
Spring Security By default provides some implementation of the UserDetailsService such as InMemoryUserDetailsManager, JdbcUserDetailsManager etc. Each of these services can look up the user details based on the provided username from Memory, Database. We can create our own implementation of UserDetailsService that can lookup users from Memory, DB, text file, excel spreadsheet, LDAP, wherever we want. Its completely up to the implementation. UserDetailsService returns an instance of UserDetails to the AuthenticationProvider. The contract is as below:
public interface UserDetails extends Serializable {
    Collection<? extends GrantedAuthority> getAuthorities();

    String getPassword();

    String getUsername();

    boolean isAccountNonExpired();

    boolean isAccountNonLocked();

    boolean isCredentialsNonExpired();

    boolean isEnabled();
}
Again, Spring Security comes bundled with implementation of this UserDetails interface as well.
PasswordEncoder
This is needed by the AuthenticationProviders to match the password present in the UserDetails with the password present in the Authentication request. This is required as passwords don’t get stored in clear-text. It is first hashed using a proper cryptographic algorithm then gets stored either in DB or in LDAP or whatever form of user storage mechanism you might want to use. PasswordEncoder is also an interface with below signatures:
public interface PasswordEncoder {
    String encode(CharSequence var1);

    boolean matches(CharSequence var1, String var2);

    default boolean upgradeEncoding(String encodedPassword) {
        return false;
    }
}
Spring Security also comes bundled with quite a few implementation of PasswordEncoder. The most common among them are BcryptPasswordEncoder and Pbkdf2PasswordEncoder.
SecurityContext
Its an interface to store successful authentication information in a serializable storage. It uses something called SecurityContextHolder that stores the authenticated information to the ThreadLocal object. This can store the authentication information such as the UserDetails object as well as the request details such as from which IP address the request was made etc. After AuthenticationManger returns the valid authentication status to the AuthenticationFilter, the filter stores the complete authentication details to the security context for further reference.
Now that we already know each of the component involved in Spring Security Architecture, its the time to extend our application a little further. Because as of now we do not have any control over any component in the entire architecture and spring is giving a random credential for us to login, which can not be used in any kind of real world scenario.
Before we proceed further to extend our application, spring security also provides us a control to specify our own user credentials. you can checkout the very next commit at this point or follow along by changing the application.properties like below:
spring.security.user.name=johndoe
spring.security.user.password=12345
Both of the above option is pretty boring and does not contribute to any real world scenario. It is suitable for quick prototyping purpose only. Now lets jump into the real deal and extend our application slowly.
Extending our Application further
If you are following along with the code repository, you can checkout the next commit at this point.
I have added one package named config and created a SecurityConfig file as below:
@Configuration
public class SecurityConfig {
    @Bean
    public UserDetailsService userDetailsService() {
        var userDetailsService = new InMemoryUserDetailsManager();
        var user1 = User.withUsername("testuser").password("12345").authorities("read", "write").build();
        userDetailsService.createUser(user1);
        return userDetailsService;
    }
}
Understanding the above code
In SecurityConfig I have created a Bean of Type UserDetailsService. The specific out of the box implementation that I have used is InMemoryUserDetailsManager. This is a very basic UserDetailsService that Spring Security provides by default. It stores the user info in memory which is non-persistent. If you look at the implementation of InMemoryUserDetailsManager, you will see its an implementation of UserDetailsManager which again extends UserDetailsService. Along with loadUserByUsername(), UserDetailsManager also has other CRUD methods as follows:
public interface UserDetailsManager extends UserDetailsService {
    void createUser(UserDetails var1);

    void updateUser(UserDetails var1);

    void deleteUser(String var1);

    void changePassword(String var1, String var2);

    boolean userExists(String var1);
}
So, by looking at the interfaces, we can definitely say, we will use a direct implementation of UserDetailsService when we do not need to manage the users in our application. These are the scenarios where we are consuming another 3rd party database to access the user details, or there may be another micro-service that manages the user details.
But in situations where we want to manage the users at our end, we want to have an implementation of UserDetailsManager. Because this interface gives us the abstract methods to manage the users as well.
Again, in our code, we have created a User. This is an implementation of UserDetails(which we have talked about in previous section) that Spring security provides us.
Now, lets try to access the same endpoint by providing the credentials we have used to create the UserDetails.
You might be confused with the fact that you are not able to access the endpoint even though you are providing the correct credentials. Now if you come back to your IDE and take look at the console, you will see a stack trace with an exception below:
2021-08-02 20:32:10.261 ERROR 12064 --- [nio-8080-exec-1] o.a.c.c.C.[.[.[/].[dispatcherServlet]    : Servlet.service() for servlet [dispatcherServlet] in context with path [] threw exception

java.lang.IllegalArgumentException: There is no PasswordEncoder mapped for the id "null"
The error clearly says that the authentication provider needed a PasswordEncoder, but it could not find any in the application context. So lets create one.
Creating a PasswordEncoder
Creating a password encoder for the authentication provider to work is pretty easy. You just need to add this code below in your SecurityConfig file. If you are following along with git, then checkout the next commit at this point.
@Bean
    public PasswordEncoder passwordEncoder() {
        return NoOpPasswordEncoder.getInstance();
    }
Now, run the code and access the endpoint again. This time it will give you the intended response.
Why NoOpPasswordEncoder is showing stroked through
This is because NoOpPasswordEncoder is deprecated and being discouraged to use in a real application. But as this is a tutorial and the user details are not currently stored in any persistent storage, we can follow along as of now. But for the sake of understanding we will change our code a bit to use BcryptPasswordEncoder.
You can checkout the next commit at this point.
Using Bcrypt
To convert to Bcrypt, return an instance of BcryptEncoder in the Bean method and then inject it in the Bean method of the UserDetailsService. While storing the password, just use the encode method of the encoder to run through the hash function before storing it to the memory.
@Bean
public PasswordEncoder passwordEncoder() {
    return new BCryptPasswordEncoder();
}
@Bean
public UserDetailsService userDetailsService(PasswordEncoder passwordEncoder) {
var userDetailsService = new InMemoryUserDetailsManager();
var user1 = User.withUsername("testuser").password(passwordEncoder.encode("12345")).authorities("read", "write").build();
userDetailsService.createUser(user1);
return userDetailsService;
}Make sure the code works by accessing the endpoint.
How to access the logged in user’s info
Okay, so we have successfully secured our application and customized the security a bit by adhering to the Spring Security architecture. But you might ask how can you access logged in user info in your services to carry out business logic where the logic depends on the logged in user. Or maybe you want to show the logged in user’s name in your JSP or Thymeleaf pages. There are more than one single way to achieve this, but as of now we will stick to the easiest one.
Go to your REST Controller and change your code to something like this. Also you can checkout the next commit at this point.
@GetMapping
public String test(Authentication authentication) {
    return "Hello " + authentication.getName();
}
We have just injected an Authentication object into our controller method and then accessing the getName() method will give us the logged in user’s name. Pretty cool!! Right? This was possible as the AuthenticationFilter stored the authentication object to the SecurityContext.
We will talk about the Authentication as well as other methods to get logged in user’s info in great detail in future lessons.
I have also updated the SecurityConfig to have multiple users like below:
 var user1 = User.withUsername("testuser").password(passwordEncoder.encode("12345")).authorities("read", "write").build();
 var user2 = User.withUsername("testuser2").password(passwordEncoder.encode("67890")).authorities("read", "write").build();
 userDetailsService.createUser(user1);
 userDetailsService.createUser(user2);
Now if you access the endpoint in Postman, you would see different names appearing in the response body based on the credentials you are providing.
Conclusion
In this long article we have understood the core architecture of Spring Security and created a really basic application with a secured REST endpoint. We have also learned how to use Out of the Box Implementations of Spring Security components. In the next lesson, we will create our own UserDetailsService and use Database and JPA to perform the user lookup.
Until then, Happy coding. 🙏🙏🙏