
Before we start
Before we start this chapter, I want to apologize for not continuing with the series for the past 8 months. From this chapter onwards, I will try to be consistent. I am also hopeful to end the series within 2022. But this long pause does not mean that the previous chapters have become irrelevant. Those still hold good. What I will do going forward is, use Java 17 as this is the latest LTS version as of writing this and will conclude the series using that. The projects which are already covered will also be upgraded with the latest version. But when you follow previous two chapters, you can follow along as described in those articles. This delay will also allow us to utilize some of the Spring Security features which were rewritten and made generally available during this time. With that being said, lets continue…
Role Of AuthenticationProvider
If we can recall what we have understood in Chapter 1 is that, the AuthenticationProvider holds the business logic that validates an incoming authentication request. Optionally it uses 2 components who help it with validating the authentication request. They are UserDetailsService and the PasswordEncoder. Here is the architecture diagram of Spring Security for your reference, again. We have discussed the individual component of this in great details in Chapter 1 already.
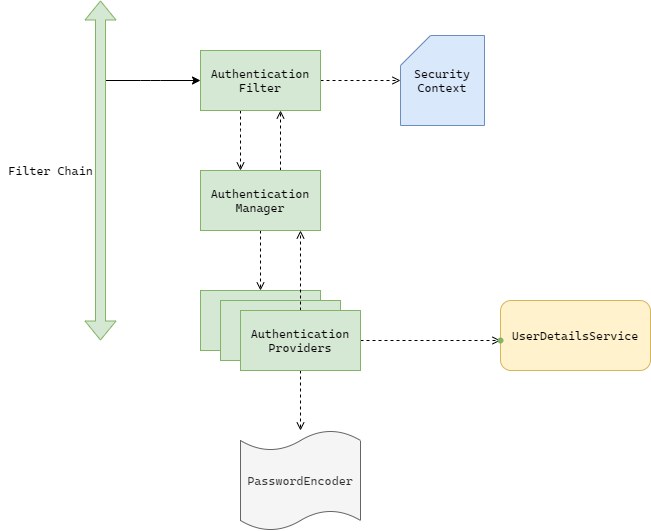
From the above diagram, we can see that AuthenticationManager keeps track of all the available AuthenticationProviders in the application. Yes there can be multiple providers when there are different types of authentication mechanism available, for example username-password based, social login and Enterprise SSO, all at once. For this, there will be 3 AuthenticaitonProviders who can handle those 3 types of authentication respectively.
Lets understand more on this by creating a project and making our own provider.
Creating The application
We will create a basic Spring Boot application using Spring Initiliazr. You can checkout spring-security-chapter-3 branch from the git repository to go through the codebase. You can checkout the first commit of the branch to follow along. As of now, we added only 3 dependency. We already know the reason from Chapter 1. But still, let’s quickly go through them.
- Spring Web: We will use Spring MVC to create secured endpoint.
- Spring Security: To secure the application.
- Lombok: To write Less code.
We have also added a TestController just to check everything is working fine with Spring Security.
@RestController
@Slf4j
public record TestController() {
    @GetMapping
    public String test(){
        return "Hello World";
    }
}
Hitting http://localhost:8080 would give us 401 if we don’t provide the auto generated credentials in the basic auth section. We have already understood these in details in Chapter 1. This is the default feature that we get, now let’s come out of the default feature and customize the security stack slowly to meet our need.
Let’s create our own AuthenticationProvider. But before that we will create a simple UserDetailsService which our AuthenticationProvider will use later on. We have already seen how to create a UserDetailsService that talks to a database in Chapter 2. For that reason we keep it simple this time, so that we can focus more on our custom AuthenticationProvider. You can checkout the next commit at this point.
Creating SecurityConfig and UserDetailsService
We will create a SecurityConfig file and create a Bean of type InMemoryUserDetailsManager like we have done in here.
@Configuration
public class SecurityConfig {

    @Bean
    public UserDetailsService userDetailsService(PasswordEncoder passwordEncoder) {
        var userDetailsService = new InMemoryUserDetailsManager();
        var user1 = User.withUsername("testuser").password(passwordEncoder.encode("12345")).authorities("read", "write").build();
        var user2 = User.withUsername("testuser2").password(passwordEncoder.encode("67890")).authorities("read", "write").build();
        userDetailsService.createUser(user1);
        userDetailsService.createUser(user2);
        return userDetailsService;
    }

    @Bean
    public PasswordEncoder passwordEncoder() {
        return NoOpPasswordEncoder.getInstance();
    }
}
Creating our first AuthenticationProvider
We will create a class CustomAuthProvicer implementing from Spring Security’s AuthenticatioProvider contract. You need to override 2 abstract methods in your custom provider after this. They are:
- authenticate: This method takes in an Authentication object as argument and also returns Authentication. By design it also throws AuthenticationException. More on these individual types later on.
- supports: This method accepts a generic Class<?> type and returns a Boolean.
Below is the contract from spring security.
public interface AuthenticationProvider {
    Authentication authenticate(Authentication authentication) throws AuthenticationException;

    boolean supports(Class<?> authentication);
}
The “supports()” method
This method is called by the AuthenticationManager to figure out if a particular type of Authentication is supported by the provider in question. Authentication is nothing but a contract from spring security which identifies an authentication process. Spring security comes bundled with quite a few implementation of this Authentication which you can look at using your IDE by searching for the interface and then looking at all available implementation by clicking on the gutter Icon. We will be working with UsernamePasswordAuthenticationToken today. But in future, we will create our own Authentication mechanism. So for example, if our custom provider supports UsernamePasswordAuthenticationToken, then the implementation would be something like this:
@Override
public boolean supports(Class<?> authentication) {
    return UsernamePasswordAuthenticationToken.class.equals(authentication);
}
The “authenticate()” method
After AuthenticationManager receives true by calling the support() method, it calls authenticate() next, by passing the instance of the Authentication that it received from the AuthenticationFilter so that the provider can execute whether the instance is a valid authentication request or not. In this method, 3 situations might occur:
- The provider was successfully able to process the Authentication by taking the help from UserDetailsService and PasswordEncoder optionally. In this case it will return a “fully authenticated” object. This is nothing but object of same type where “isAuthenticated” flag is set to true and all the authorities are populated. The incoming Authentication object is not a fully authenticated one, it just contains the username (principal) and/or credentials so that UserDetailsService and PasswordEncoder can make use of them.
- The authentication credentials are not correct. It that case it should throw AuthenticationException or any subclass of this. Spring security also provides us lots of subclass for different purpose. But for this situation UsernameNotFoundException and BadCredentialsException are quite common.
- It returns null for any other case. This indicates that the provider supports this type of authentication, but for some reason it can not authenticate the specific instance of authentication. If the AuthenticationManager receives a null from the provider, it assumes that the provider can not perform the validation and so it(the manager) continues to find if there are any other providers who can support the authentication type. If all the available providers are exhausted, then the AuthenticationManager throws ProviderNotFoundException.
Now that we know what does these methods do, lets implement them to meet our need. You can check out the next commit at this point.
Implementing the AuthenticationProvider methods.
Now that we understand what are authenticate() and supports() used for, lets implement them to meet our need.
@Override
public Authentication authenticate(Authentication authentication) throws AuthenticationException {
    String userName = authentication.getName();
    String password = String.valueOf(authentication.getCredentials());
    UserDetails user = null;
    try {
        user = userDetailsService.loadUserByUsername(userName);
    } catch (UsernameNotFoundException ex) {
        log.error("user with name {} not found. Error thrown with message: {}", userName, ex.getMessage());
        throw ex;
    }
    if (Objects.nonNull(user)) {
    log.debug("User found. checking password");
        if (passwordEncoder.matches(password, user.getPassword())) {
            log.debug("User authenticated. Returning fully authenticated object");
            return new UsernamePasswordAuthenticationToken(userName, password, user.getAuthorities());
        } else {
            log.error("Password did not match. {} will be thrown",
                BadCredentialsException.class.getSimpleName());
            throw new BadCredentialsException("Error, password did not match");
        }
    }
    return null;
}
@Override
public boolean supports(Class<?> authentication) {
    log.debug("Checking whether {} support {} or not",
            getClass().getSimpleName(),
            authentication.getSimpleName());
    val result = UsernamePasswordAuthenticationToken.class.equals(authentication);
    log.debug("The authentication type is " + (result ? "supported" : "not supported"));
    return result;
}
We can see that we have surrounded the call to userDetailsService.loadUserByUsername() with a try-catch for a probable UsernameNotFoundException. Because, by design loadUserByUsername() should throw the exception if the user is not found. If we recall the way we developed our own UserDetailsService here, we can see we have also done the same. Now register this provider with AuthenticationManager so that it can consider the provider if it receives authentication request from AuthenticationFilter.
To do that, lets create another Config file(Just to avoid circular dependency). You can avoid that by using explicit setter dependencies, and all configs can be added to single SecurityConfig file. But I did not do that to write less code per class. As we are focusing on Spring security here, we can go ahead with this approach.
@Configuration
@RequiredArgsConstructor
public class WebSecurityConfig extends WebSecurityConfigurerAdapter {
    private final CustomAuthProvider customAuthProvider;

    @Override
    protected void configure(AuthenticationManagerBuilder auth) throws Exception {
        auth.authenticationProvider(customAuthProvider);
    }
}
Here, we have created another config class and extended it from WebSecurityConfigurerAdapter so that we can override one of it’s many configure() method(There are multiple configure() method. But we are interested in the one which takes an AuthenticationManagerBuilder as input). If we had multiple providers in our application, we could register all of them in this very method like below
auth.authenticationProvider(provider1)
    .authenticationProvider(provider2)
    .authenticationProvider(provider3);
It’s time to validate
In Postman, we can hit http://localhost:8080 by passing the basic authentication credentialss in Auth tab and can see a successful response. If we go back to the log, then we can see something like below:
2022-04-23 15:40:55.206 DEBUG 14488 --- [nio-8080-exec-2] c.s.ssc3.providers.CustomAuthProvider    : Checking whether CustomAuthProvider support UsernamePasswordAuthenticationToken or not
2022-04-23 15:40:55.207 DEBUG 14488 --- [nio-8080-exec-2] c.s.ssc3.providers.CustomAuthProvider    : The authentication type is supported
2022-04-23 15:40:55.207 DEBUG 14488 --- [nio-8080-exec-2] c.s.ssc3.providers.CustomAuthProvider    : User found. checking password
2022-04-23 15:40:55.207 DEBUG 14488 --- [nio-8080-exec-2] c.s.ssc3.providers.CustomAuthProvider    : User authenticated. Returning fully authenticated object
Now if we hit the URL multiple times, we can see that the logs are not appearing any more, just like we have seen in chapter 2. As we have created our own provider now, we can say that the subsequent request are getting intercepted by different filter which forwards a different type of authentication request to the authentication manager, resulting use of a completely different provider that is coming out of the box from Spring security. If we delete the JSESSIONID cookie, and hit the URL again, then we can see, our provider being used again.
Conclusion
In this chapter, we have created our own AuthenticationProvider. In the next chapter we can look at how we can work with the FilterChain and have our own AuthenticationFilter.
Until then, happy coding …. 🙏🙏🙏